2016년 2월 1일 월요일

Create a new Feature using a remote URL

In MAF 2.2.1, when you create a new feature with a remote URL, you will face following error when you click the navigation button on your iPhone, iPad or Simulator.


App Transport Security has blocked a cleartext HTTP (http://) resource load since it is insecure. Temporary exceptions can be configured via your app's Info.plist file.


You can solve this problem by choosing 'Disable Application Transport Security' on following iOS Options dialog.


Another solutions are introduced on many websites. following is one of them.

https://teamtreehouse.com/community/20150918-220456167-security-has-blocked-a-cleartext-http-http-esource-load-since


2015년 10월 2일 금요일

[ionic-mcs-part01] - create ionic application


Over a series of articles, I am going to show you how to develop an ionic mobile app using Oracle MCS(Mobile Cloud Service) APIs such as Platform APIs including storage services, user management services and push notification services and Custom APIs which are implemented by mobile developers.

In this article, I am going to tell you how to create a simple ionic app that has multiple languages feature and app preferences feature.

Create New Ionic Application


$ ionic start MCSSample sidemenu --id com.archnal.mobile.MCSSample --appname 'MCS Sample'

$ cd MCS-Sample

$ ionic platform add android

$ ionic platform list

$ ionic run

$ bower install ngCordova --save


Edit www/index.html


<!DOCTYPE html>
<html>
  <head>


  </head>

  <body ng-app="starter">
    
  </body>
</html>
Notice line 21. ngCordova should be between ionic.bundle.js and cordova.js reference. This is very important.


Refactor Code

Edit www/templates/menu.html


Ionic MCS Utility Sample

About Login Preferences Logout

Edit www/js/app.js


// Ionic Starter App

// angular.module is a global place for creating, registering and retrieving Angular modules
// 'starter' is the name of this angular module example (also set in a  attribute in index.html)
// the 2nd parameter is an array of 'requires'
// 'starter.controllers' is found in controllers.js
angular.module('starter', ['ionic', 'starter.controllers'])

.run(function($ionicPlatform) {
  $ionicPlatform.ready(function() {
    // Hide the accessory bar by default (remove this to show the accessory bar above the keyboard
    // for form inputs)
    if (window.cordova && window.cordova.plugins.Keyboard) {
      cordova.plugins.Keyboard.hideKeyboardAccessoryBar(true);
      cordova.plugins.Keyboard.disableScroll(true);

    }
    if (window.StatusBar) {
      // org.apache.cordova.statusbar required
      StatusBar.styleDefault();
    }
  });
})

.config(function($stateProvider, $urlRouterProvider) {
  $stateProvider

    .state('app', {
    url: '/app',
    abstract: true,
    templateUrl: 'templates/menu.html',
    controller: 'AppCtrl'
  })

  .state('app.about', {
    url: '/about',
    views: {
      'menuContent': {
        templateUrl: 'templates/about.html'
      }
    }
  })

  .state('app.preferences', {
      url: '/preferences',
      views: {
        'menuContent': {
          templateUrl: 'templates/preferences.html'
        }
      }
    });
  // if none of the above states are matched, use this as the fallback
  $urlRouterProvider.otherwise('/app/about');
});


Edit www/templates/about.html


Edit www/templates/preferences.html


Resources

Starting an Ionic App
Getting Started with ngCordova
Easy global i18n angularJS language translations for your Angular app

[ionic-mcs-part02] - i18n


Localization


Install angular-translate


$ bower install angular-translate 

$ bower install angular-translate-loader-static-files


Edit www/index.html


add two java script files right after ionic.bundle.js


Edit www/js/app.js


// Ionic Starter App

// angular.module is a global place for creating, registering and retrieving Angular modules
// 'starter' is the name of this angular module example (also set in a  attribute in index.html)
// the 2nd parameter is an array of 'requires'
// 'starter.controllers' is found in controllers.js
angular.module('starter', ['ionic', 'starter.controllers', 'pascalprecht.translate'])

.run(function($ionicPlatform) {
  $ionicPlatform.ready(function() {
    // Hide the accessory bar by default (remove this to show the accessory bar above the keyboard
    // for form inputs)
    if (window.cordova && window.cordova.plugins.Keyboard) {
      cordova.plugins.Keyboard.hideKeyboardAccessoryBar(true);
      cordova.plugins.Keyboard.disableScroll(true);

    }
    if (window.StatusBar) {
      // org.apache.cordova.statusbar required
      StatusBar.styleDefault();
    }
  });
})

.config(function($stateProvider, $urlRouterProvider, $translateProvider) {
    $translateProvider.useStaticFilesLoader({
      prefix: 'languages/',
      suffix: '.json'
    });
    //$translateProvider.preferredLanguage('ko_KR');
    $translateProvider.determinePreferredLanguage();

  $stateProvider

    .state('app', {
    url: '/app',
    abstract: true,
    templateUrl: 'templates/menu.html',
    controller: 'AppCtrl'
  })

  .state('app.about', {
    url: '/about',
    views: {
      'menuContent': {
        templateUrl: 'templates/about.html'
      }
    }
  })

  .state('app.preferences', {
      url: '/preferences',
      views: {
        'menuContent': {
          templateUrl: 'templates/preferences.html'
        }
      }
    });
  // if none of the above states are matched, use this as the fallback
  $urlRouterProvider.otherwise('/app/about');
});


In the above source code, at the line 7, please notice that 'pascalprecht.translate'  is added. And you should take a close look at from line 25 to 31. At Line 25, don't miss that $translateProvider is injected as a function parameter. In this case, you need some json files to handle multi-languages.

I will add two json files that contain local messages. If you need to support some other languages, you can add

  • www/languages/en_US.json
  • www/languages/ko_KR.json


Those JSON files look like as follows


www/languages/en_US.json


{
  "MENU_TITLE": "Ionic MCS Utility Sample",
  "MENU_ABOUT": "About",
  "MENU_PREFERENCES": "Preferences",
  "MENU_LOGIN": "Login",
  "MENU_LOGOUT": "Logout"

}


www/languages/ko_KR.json


{
  "MENU_TITLE": "Ionic MCS Utility Sample",
  "MENU_ABOUT": "About",
  "MENU_PREFERENCES": "환경설정",
  "MENU_LOGIN": "로그인",
  "MENU_LOGOUT": "로그아웃"

}


You might not understand Korean labels, but don't worry about it. I believe you can change it into your own language. Anyway now let's apply localised message to our mobile app.

Edit www/templates/menu.html


{{ 'MENU_TITLE' | translate }}

{{ 'MENU_ABOUT' | translate }} {{ 'MENU_LOGIN' | translate }} {{ 'MENU_PREFERENCES' | translate }} {{ 'MENU_LOGOUT' | translate }}

You can see {{ 'MENU_TITLE' | translate }} at line number 17 and it means that the value of 'MENU_TITLE' saved in {langKey}.json file in www/languages directory will be shown on the screen of your phone.


Result

Menu Labels when you set the language configuration of your phone as "Korean"

Menu labels when you set the language configuration of your phone as "English"


Resources


Easy global i18n angularJS language translations for your Angular app

2014년 11월 22일 토요일

OSX Oracle JDK 1.7 + 이클립스에서 한글(utf-8) 문제 해결 하기


출처: http://milines.egloos.com/viewer/3901667


~/.bash_profile


export LC_CTYPE=ko_KR.UTF-8

export _JAVA_OPTIONS=-Dfile.encoding=UTF-8


터미널에서

~$ open -n /Users/nicholas/oracle/oepe-12.1.3.2-luna-maf/Eclipse.app

2014년 11월 10일 월요일

Mac OS에서 Java File명 한글 자소 분리 현상

Mac OS X 10.10 Yosemite 에서 JDK 1.7 환경에서 작업중이었는데,

파일 명이 아래와 같은 파일일때 

강원도_강릉시_001.html

아래의 for 구문에서 "강원도_강릉시"를 추출해서 Map의 키로 사용하는 코드를 작성 중인덴
자꾸 Null 을 리턴한다.


for(String filename: storeDir.list(new ExtensionFilenameFilter(".html"))) {
    String districtIdKey = filename.substring(0, filename.lastIndexOf('_'));
}


우연히 화면에 찍힌 로그를 카피해서 이클립스가 아닌 다른 에디터에 붙혀넣기 했더니
한글의 자소가 모두 분리 된 것처럼 찍혔다.
ㄱㅏㅇㅇㅝㄴㄷㅗ_ㄱㅏㅇㄹㅡㅇㅅㅣ ... 뭐 이런 식으로..

그래서 아래와 같이 문자배열을 받아서 찍어 봤더니, 진짜로 한글의 각 자소가 찍히면서
문자열 자체가 다른 것으로 보여졌다.

char[] arr = districtIdKey.toCharArray();
for(int i = 0; i < arr.length; i++) {
    System.out.println(arr[i] + " ==> " + Integer.toHexString(arr[i]));
}

ᄀ ==> 1100
ᅡ ==> 1161
ᆼ ==> 11bc
ᄋ ==> 110b
ᅯ ==> 116f
ᆫ ==> 11ab
ᄃ ==> 1103
ᅩ ==> 1169
_ ==> 5f
ᄀ ==> 1100
ᅡ ==> 1161
ᆼ ==> 11bc
ᄅ ==> 1105
ᅳ ==> 1173
ᆼ ==> 11bc
ᄉ ==> 1109
ᅵ ==> 1175


해결책

java.text.Normalizer 클래스를 이용하여 해결함.

districtIdKey = Normalizer.normalize(districtIdKey, Normalizer.Form.NFC);

2014년 2월 18일 화요일

Spring Framework 의 Dynamic Class 파일 저장

스프링 프레임웍에서 @Transactional 이나 @Cachable 과 같은 Annotation을 사용하여 개발하는 경우에 BeanFactory는 동적으로 관련 코드가 삽입된 Bean 클래스를 생성한다. 동적으로 코드를 생성할 때 사용되는 기술은 Java의 Dynamic Proxy 와 CGLIB이며, 별도의 설정이 없는 경우에 Dynamic Proxy를 디폴트로 사용한다.
이처럼 동적으로 생성되는 클래스는 기존 빈에 스프링의 기능들이 추가된 클래스이기 때문에 커스터마이징 할 수는 없다. 하지만 스프링이 어떻게 Proxy 클래스를 만드는 지 확인하기 위해서 클래스 파일을 로컬 파일 시스템에 저장하고 디컴파일 하여 소스 코드를 살펴보고 싶었다.
엄밀히 말하면 이번 포스트는 스프링의 기능에 관한 이야기가 아니라 Java Dynamic Proxy와 CGLIB에서 동적으로 생성되는 클래스를 로컬 파일 시스템에 저장하는 옵션에 관한 설명이다.

Java Dynamic Proxy


Java 실행 옵션으로 아래의 옵션을 추가해주면 된다.
-Dsun.misc.ProxyGenerator.saveGeneratedFiles=true

주의 해야 할 점은 JVM 의 실행 디렉터리를 기준으로 Proxy 클래스를 저장하는데, 해당 클래스의 패키지에 해당하는 폴더를 미리 만들어 주어야 한다는 것이다. 실행 시 디렉터리가 없을 때 FileNotFoundException이 발생한다.
org/springframework/core/ 폴더에 $Proxy0 클래스가 생성된다.
com/sun/proxy/ 폴더에 $Proxy1, $Proxy2 ... 클래스들이 생성된다.
그렇기 때문에 이 옵션을 사용하기 위해서는 Java 실행 디렉터리에 위 두 폴더를 미리 생성해 두는게 좋다.
동적으로 생성되는 클래스의 소스 코드를 확인하고자 한다면 jad 같은 디컴파일 도구를 사용해야 한다.
아래 소스 코드는 디컴파일된 소스 코드의 일부분이다.

package com.sun.proxy;

import com.archnal.springcache.service.CacheExampleService;
import java.lang.reflect.*;
import org.aopalliance.aop.Advice;
import org.springframework.aop.*;
import org.springframework.aop.framework.Advised;
import org.springframework.aop.framework.AopConfigException;

public final class $Proxy13 extends Proxy
    implements CacheExampleService, SpringProxy, Advised
{

    public $Proxy13(InvocationHandler invocationhandler)
    {
        super(invocationhandler);
    }

    ...

}


이 $Proxy13 클래스의 advisor 를 확인하고 싶으면 아래와 같이 출력해 볼 수 있다.

if(beanClassName.equals("com.sun.proxy.$Proxy13")) {

    Advised advised = (Advised) bean;
    System.out.println("target class: " + advised.getTargetClass());
    for(Advisor advisor: advised.getAdvisors()) {
        System.out.println("advisor: " + advisor);
    }

}

실행 결과 아래와 같이 출력된다.

target class: class com.archnal.springcache.service.CacheExampleServiceImpl

advisor: org.springframework.cache.interceptor.BeanFactoryCacheOperationSourceAdvisor: advice bean 'org.springframework.cache.interceptor.CacheInterceptor#0'

CGLIB   

CGLIB에서 동적으로 생성되는 클래스를 로컬 파일 시스템에 저장하기 위해서는 아래와 같이 Java 실행 옵션에 추가해야 한다.


-Dcglib.debugLocation=/Users/nicholas/cglib-debug 

클래스들이 저장될 경로를 지정하면 되고, 각 클래스들의 패키지에 해당하는 디렉터리는 자동생성된다.

아래와 같이 스프링 설정을 변경하면 CGLIB를 사용하여 프록시를 만든다.


<bean id="cacheExampleService"
        class="com.archnal.springcache.service.CacheExampleServiceImpl">
                <aop:scoped-proxy proxy-target-class="true"/>

</bean>


By Setting proxy-target-class="true" you will be using CGLIB2 for your proxies, instead of jdk proxys.

하지만 CGLIB 에서 생성한 클래스들은 몇개의 디컴파일 툴로 확인해 본 결과, 디컴파일이 깔끔하게 되지 않는 것 같다.

Resources

http://javahowto.blogspot.kr/2011/12/java-dynamic-proxy-example.html


2013년 8월 16일 금요일

VirtualBox에서 저장소 확장하기


VirtualBox로 작업을 하다보면 저장소의 용량이 부족한 경우가 있다.
이런 경우에는 저장소를 필요한 만큼 새로 만든 후에 동일한 경로로 마운트할 수 있다.

http://download.oracle.com/otn/vm/bi/v305/SampleAppv305_UserGuide.pdf?AuthParam=1376637137_863fb9c6ed350180a7c24383fe6f994b

위 파일에서 2.6 How to increase disk space on the VM 절을 보면 자세히 설명되어 있다.

이렇게 하려면 Logical Volumn Manager가 필요한데, 혹시 설치가 되어 있지 않으면 아래와 같이 실행한다.

# yum install system-config-lvm

자세한 내용은 아래와 같다.
http://www.oracle-base.com/articles/linux/linux-logical-volume-management.php


2013년 8월 15일 목요일

ubuntu 에서 특정 버전의 패키지 설치하기


apt-get install 명령어를 사용하면 대부분 ubuntu에서 관련 패키지를 설치하는데 어려움이 없다.
unzip 프로그램을 설치하려고 아래와 같이 명령어를 타이핑했으나 관련 파일을 찾을 수 없다는 에러가 떴다.


emillian@jupiter:~/raspberry_pi$ sudo apt-get install unzip
[sudo] password for emillian:
Reading package lists... Done
Building dependency tree
Reading state information... Done
Suggested packages:
  zip
The following NEW packages will be installed:
  unzip
0 upgraded, 1 newly installed, 0 to remove and 15 not upgraded.
Need to get 156kB of archives.
After this operation, 360kB of additional disk space will be used.
Err http://kr.archive.ubuntu.com intrepid/main unzip 5.52-11ubuntu1
  404 Not Found
Failed to fetch http://kr.archive.ubuntu.com/ubuntu/pool/main/u/unzip/unzip_5.52-11ubuntu1_i386.deb  404 Not Found
E: Unable to fetch some archives, maybe run apt-get update or try with --fix-missing?


웹브라이저로 확인해 보니 unzip_5.52-11ubuntu1_i386.deb 파일은 없고 unzip_5.52-10ubuntu1_i386.deb 파일이 있었다.

wget 명령어를 이용해서 패키지를 수동으로 내려 받았다.
> wget ftp://kr.archive.ubuntu.com/ubuntu/pool/main/u/unzip/unzip_5.52-10ubuntu2_i386.deb


내려 받은 패키지를 수동으로 설치하였다.
>  sudo dpkg -i unzip_5.52-10ubuntu2_i386.deb


2013년 8월 5일 월요일

Maven WAR Package 시 webapp/META-INF/MANIFEST.MF 파일 지정하기


webapp/MEATA-INF/MANIFEST.MF 파일을 생성해서 저장해도 아래와 같이 지정하지 않으면 maven이 디폴트로 생성하는 내용으로 MANIFEST.MF 파일이 overwrite 됩니다.
pom.xml 파일을 열어서 plugins 에 아래와 같이 추가하면 특정파일로 MANIFEST.MF 파일을 사용할 수 있습니다.


<plugin> <groupId>org.apache.maven.plugins</groupId> <artifactId>maven-war-plugin</artifactId> <configuration> <archive> <manifestFile>src/main/resources/META-INF/MANIFEST.MF</manifestFile> </archive> </configuration> </plugin>  


MANIFEST.MF 파일 예제

Manifest-Version: 1.0
Ant-Version: Apache Ant 1.7.0
Created-By: Apache Ant
Extension-List: WeblogicSpring
WeblogicSpring-Extension-Name: weblogic-spring
WeblogicSpring-Specification-Version: 12.1.2.0.0
WeblogicSpring-Implementation-Version: 12.1.2.0.0

2013년 2월 13일 수요일

FileVisitor 를 이용한 긴 이름 파일 지우기

Abstract

JDK 7에 포함된 java.nio.file 패키지의 FileVisitor를 이용하여 Window7 에서 긴 파일명을 삭제하지 못해 디렉터리를 삭제할 수 없을 경우에 아래와 같이 사용하면 된다.
Visitor 패턴의 대표적인 유즈케이스인 디렉터리를 리커시브하게 둘러치며 파일 찝적대는 프로그래밍하던 수고를 JavaSE 1.7 안에 포함시켰다.

DerectoryDelete

----------------------------------------------------------

package toughguy.nicholas.utils.file;

import java.io.File;
import java.io.IOException;
import java.nio.file.FileVisitResult;
import java.nio.file.Files;
import java.nio.file.Path;
import java.nio.file.Paths;
import java.nio.file.SimpleFileVisitor;
import java.nio.file.attribute.BasicFileAttributes;

public class DirectoryDelete extends SimpleFileVisitor {

private final File basedir;

public DirectoryDelete(File basedir) {
super();

this.basedir = basedir;
}


@Override
public FileVisitResult visitFile(Path file, BasicFileAttributes attrs)
throws IOException {

if(attrs.isRegularFile()) {
System.out.println("delete file: " + file.getFileName());
Files.delete(file);
}

return FileVisitResult.CONTINUE;
}


@Override
public FileVisitResult postVisitDirectory(Path dir, IOException exc)
throws IOException {

System.out.println("delete directory: " + dir);
Files.delete(dir);
return FileVisitResult.CONTINUE;
}


public void delete() throws IOException {
Path path = Paths.get(this.basedir.toURI());
Files.walkFileTree(path, this);
}


}
------------------------------------------------------------------

테스트 코드

----------------------------------------------------------

package toughguy.nicholas.utils.file;

import java.io.File;

import org.junit.Test;


public class DirectoryDeleteTest {

@Test
public void testDirectoryDelete() throws Exception  {
File dir = new File("C:/WebCenterSites");
DirectoryDelete directoryDelete = new DirectoryDelete(dir);
directoryDelete.delete();
}
}

----------------------------------------------------------


Resources:


2012년 11월 20일 화요일

Eclipse에서 Maven Module 생성


Abstract

Maven으로 개발을 진행할 때 연관 프로젝트를 module로 분할하여 관리하면 버저닝이나 어플리케이션 배포시 여러 이점을 제공하고 프로퍼티나 dependency를 공유할수 있는 장점이 있다.

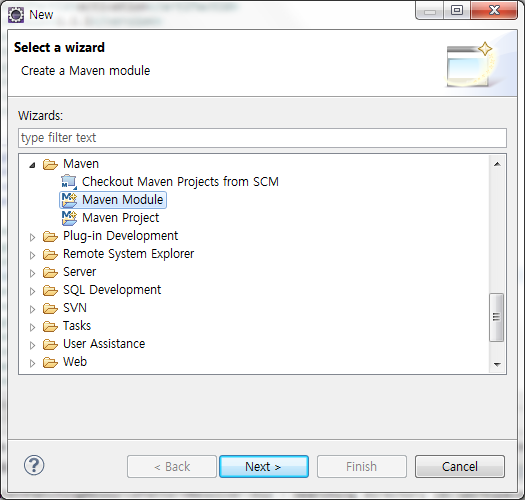
Step1 - Maven Module 생성


Step 2 - Module 명 지정

parent package와 Module 명을 지정한다.


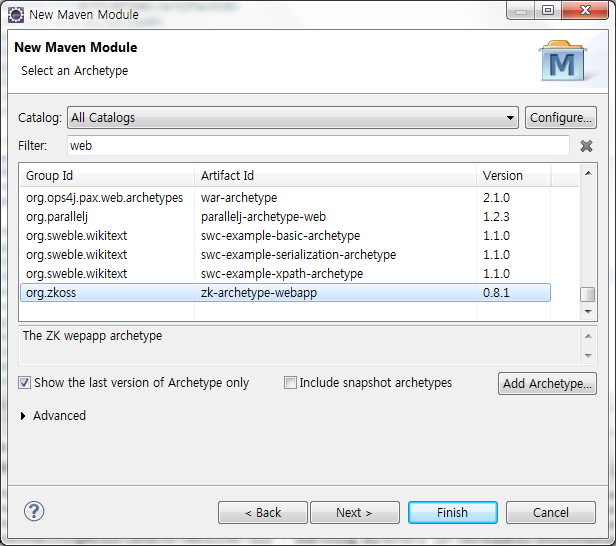
Step 3 - Archetype 지정

생성할 프로젝트에 적절한 archetype을 지정한다. 아래의 예제는 webapp 목록 중에서 하나를 선택한 것이다.


Step 4 - 모듈 정보 설정

모듈에 대한 버전을 설정한다.


2012년 11월 7일 수요일

WebService Study를 위한 링크

http://www.albinsblog.com/search/label/Weblogic


http://metro.java.net/guide/ch02.html

http://jaxws-ws.blogspot.kr/

http://frommyworkshop.blogspot.kr/2010/07/configure-apache-cxf-project-to-deploy.html

http://jax-ws.java.net/2.2.6/docs/ch03.html

http://sqltech.cl/doc/oas10gR3/web.1013/b25603/appjaxrpcmapping.htm


http://docs.oracle.com/cd/E12840_01/wls/docs103/webserv_ref/anttasks.html

2012년 10월 18일 목요일

Wireshark로 localhost 패킷 보기

사실 Wireshark로 패킷을 캡처한다기 보다는 rawcap.exe를 통해서 캡처한 파일을 Wireshark로 열어서 본다는 게 더 적절하다.

원문 참조: http://erictummers.wordpress.com/2012/06/23/sniff-localhost/


1. loopback adapter 설치
2. 네트웍 설정에서 IP 설정
3. rawcap 설치
4. rawcap으로 loopback 패킷 캡처
5. 캡처된 파일을 wireshark에서 열기

1. loopback adapter 설치

Windows 시작 버튼을 클릭한 후 팝업되는 창의 좌측 하단에 위치한 입력상자에 "cmd" 라고 입력한 후 검색된 cmd.exe를 마우스 우클릭하여 관리자 권한으로 실행 시킨다.

콘솔 창에서 아래와 같이 입력한다.
> hdwwiz.exe


2. 네트웍 설정에서 IP 설정

보통 loopback driver가 설치되면 "로컬 영역 연결 2", "로컬 영역 연결 3"... 이런 이름으로 추가된다.
네트웍 설정 창에서 아래와 같이 IP 주소를 입력한다.
eg) 10.0.0.10


3. rawcap 설치

아래의 사이트에서 rawcap.exe 파일을 내려 받는다.
http://www.netresec.com/?page=RawCap


4. rawcap으로 loopback 패킷 캡처

아래와 같이 rawcap을 실행시킨다. loopback.cap을 캡처된 파일 명이므로 다른 이름으로 지정해도 무관하다.

D:\tools\rawcap>rawcap.exe 10.0.0.10 loopback.cap

CTRL + C 키를 입력하여 캡처링을 중지한다.

5. 캡처된 파일을 wireshark에서 열기

File > Open 메뉴에서 앞 단계에서 저장된 파일을 선택한다.

wireshark의 Filter에 "tcp"라고 입력한 후 Apply 버튼을 클릭한다.

목록을 마우스 우클릭하여 Follow TCP Stream 메뉴를 클릭한다.
아래와 같이 HTTP를 캡처한 내용이 화면에 출력된다.


2012년 9월 5일 수요일

Oracle Process 개수 설정

Oracle Web Center의 Portal 이나 Content를 설치하게 되면, RCU를 이용해서 스키마를 생성하거나 초기화 해야 한다.

이때 Oracle Database의 parameter 중에서 PROCESS parameter가 200개 이상 되어야 하는데, 보통 기본 값으로 150개로 설정되어 있다.

PROCESS 개수를 변경하고 Database를 재실행한다.

PROCESS 개수 확인

sqlplus를 이용해서 아래와 같이 입력하여 PROCESS 개수를 확인해 보자

SQL> show parameter processes


NAME                                 TYPE        VALUE
------------------------------------ ----------- ------------------------------
aq_tm_processes                      integer     0
db_writer_processes                  integer     1
gcs_server_processes                 integer     0
global_txn_processes                 integer     1
job_queue_processes                  integer     1000
log_archive_max_processes            integer     4
processes                            integer     150


SQL>

PROCESS 개수 변경

SQL> alter system set processes=200 scope=spfile ;


Database Shutdown

데이터베이스를 shutdown 시키거나 startup 시킬 때는 아래와 같이 sysdba 권한으로 로그인 해야 한다.

>sqlplus system as sysdba


SQL> shutdown immediate
Database closed.
Database dismounted.
ORACLE instance shut down.


Database Startup

SQL> startup


다시 PROCESS 개수가 변경되었음을 확인해보자.


SQL> show parameter processes


NAME                                 TYPE        VALUE
------------------------------------ ----------- ------------------------------
aq_tm_processes                      integer     0
db_writer_processes                  integer     1
gcs_server_processes                 integer     0
global_txn_processes                 integer     1
job_queue_processes                  integer     1000
log_archive_max_processes            integer     4
processes                            integer     200


200개로 변경되었으면 다시 RCU를 이용해서 스크마를 생성하면 정상적으로 동작한다.


2012년 7월 18일 수요일

CXF에서 Authorization 헤더 설정하기


CXF에서 HTTP Authorization 헤더에 Basic 방식으로 username, password를 전달할 때 아래와 같이 소스코드를 지정한다.


 org.apache.cxf.jaxws.JaxWsProxyFactoryBean clientFactory = new org.apache.cxf.jaxws.JaxWsProxyFactoryBean(); 
        clientFactory.setAddress("http://localhost:8080/svc-url"); // 서버 주소로 변경해 주세요
        clientFactory.setUsername(USERNAME); // username
        clientFactory.setPassword(PASSWORD); // password


HTTP Authorization 헤더의 Basic 방식인 
"username:password"가 base64 encoding 값으로 전달되는 것으로 확인되었습니다.

인증 정보 설정 후 요청 시 HTTP 요청 헤더 확인해 보시면 Authorization 헤더가 설정되어 있습니다.
 Authorization=[Basic Y2poY29uc3VtZXIxdidkxdxOndlbGNvbWUx]

2012년 3월 23일 금요일

Unable to locate Spring NamespaceHandler

원문: 감사합니다.
http://techieth8s.blogspot.com/2011/04/unable-to-locate-spring.html

오늘, 난 spring-security 관련 에러 때문에 고생하였습니다.
단지 WEB-INF/lib에 관련 library를 추가하고
http://www.springframework.org/schema/security/spring-security-3.1.xsd
를 사용하면 그만입니다.

Error:
org.springframework.beans.factory.parsing.BeanDefinitionParsingException: Configuration problem: Unable to locate Spring NamespaceHandler for XML schema namespace [http://www.springframework.org/schema/tx] Offending resource: class path resource [applicationContext.xml]
Solution: Add spring-tx.jar to WEB-INF/lib

Error:
org.springframework.beans.factory.parsing.BeanDefinitionParsingException: Configuration problem: Unable to locate Spring NamespaceHandler for XML schema namespace [http://www.springframework.org/schema/security] Offending resource: class path resource [applicationContext.xml]
Solution: Add spring-core, spring-acl, spring-config, spring-web, spring-taglibs jars to WEB-INF/lib

2012년 3월 14일 수요일

Mysql DataSource Configuration in Jboss7.1.1

원문: https://community.jboss.org/wiki/DataSourceConfigurationInAS7

jboss7.1.1 설치 디렉터리를 ${jboss-dir}로 표기함.

mysql-jdbc: mysql-connector-java-5.1.18.jar

모듈 설치

1. ${jboss-dir}/modules 디렉터리에 com/mysql/main 하위 폴더를 생성한다.
2. ${jboss-dir}/modules/com/mysql/main 에 mysql-connector-java-5.1.18.jar 파일을 복사한다.
3. ${jboss-dir}/modules/com/mysql/main 에 module.xml 파일을 생성하여 아래와 같이 수정한다.


<?xml version="1.0" encoding="UTF-8"?>
<module xmlns="urn:jboss:module:1.1" name="com.mysql">
    <resources>
        <resource-root path="mysql-connector-java-5.1.18.jar"/>
    </resources>
    <dependencies>
        <module name="javax.api"/>
    </dependencies>
</module>


DataSource 설정
${jboss-dir}/standalone/configuation/standalone.xml 파일의 datasource 항목에 아래와 같이 추가한다.


<datasources>
    <datasource jndi-name="java:jboss/datasources/ExampleDS" pool-name="ExampleDS" enabled="true" use-java-context="true">
        <connection-url>jdbc:h2:mem:test;DB_CLOSE_DELAY=-1</connection-url>
        <driver>h2</driver>
        <security>
            <user-name>sa</user-name>
            <password>sa</password>
        </security>
    </datasource>
    <datasource jndi-name="java:jboss/datasources/MysqlDS" pool-name="MysqlDS" enabled="true" use-java-context="true">
        <connection-url>jdbc:mysql://localhost:3306/mydb</connection-url>
        <driver>com.mysql</driver>
        <security>
            <user-name>dbuser</user-name>
            <password>dbpasswd</password>
        </security>
    </datasource>
    <drivers>
        <driver name="h2" module="com.h2database.h2">
            <xa-datasource-class>org.h2.jdbcx.JdbcDataSource</xa-datasource-class>
        </driver>
        <driver name="com.mysql" module="com.mysql">
            <xa-datasource-class>com.mysql.jdbc.jdbc2.optional.MysqlXADataSource</xa-datasource-class>
        </driver>
    </drivers>
</datasources>


2012년 1월 13일 금요일

국내 아이피 IP 대역

한국인터넷진흥원이 국내에 할당한 IP주소 대역은 http://ip.kisa.or.kr 사이트에서 IPv4 → 국내할당현황에서 확인 하실 수 있으며 진흥원이 IP주소 추가 확보 시 실시간 반영 됩니다.

로직은 대충 만들어봐요.